

This guide covers exporting Delta tables to Amazon S3. Auxia can also read your Unity Catalog managed tables directly via credential vending (no export) — see Unity Catalog.
1. Overview
Auxia reads data from your Databricks workspace via partitioned Parquet files written to an Amazon S3 bucket in your AWS account. You retain full control of the data — Auxia is granted read-only access to the bucket via a standard S3 bucket policy, and no credentials are exchanged. Auxia handles transferring data from your S3 bucket into our internal pipeline using GCS Storage Transfer Service (the same path documented in the Amazon S3 connection guide). Flow:- Databricks workspace on AWS with Unity Catalog enabled
- An AWS account where you can create an S3 bucket and grant bucket policy permissions
- Source tables in Delta format
- Workspace permissions to create Storage Credentials, External Locations, schemas, and notebooks
2. Export Patterns
Three export patterns are supported, depending on how your source table behaves. You can mix patterns across tables — most integrations do.
When in doubt for high-volume event data, default to the append-only pattern — it is the cheapest and simplest.
3. Create an S3 Bucket for Auxia Exports
Create a new S3 bucket in your AWS account dedicated to Auxia exports. Keep Block Public Access enabled (the default).Confirm the bucket region with your Auxia solutions engineer before creating. Co-locating with Auxia’s read infrastructure reduces cross-region transfer cost.
kms:Decrypt on the key — see the Encryption section of the Amazon S3 guide.
4. Grant Auxia Read Access on the Bucket
Auxia reads from your S3 bucket using an Auxia-managed AWS IAM role (the same role described in the Amazon S3 connection guide). Your Auxia solutions engineer will provide the exact Role ARN during onboarding. Add a bucket policy granting that roles3:GetObject, s3:ListBucket, and s3:GetBucketLocation:
5. Configure Databricks to Write to Your Bucket
Use Unity Catalog Storage Credentials + External Locations so the cloud credential is managed centrally rather than configured per cluster.- Create an AWS IAM role in your AWS account that Databricks can assume. Trust policy and required S3 write permissions are documented in the Databricks Storage Credentials guide.
- Create a Storage Credential pointing at that role: Catalog → External Data → Storage Credentials → Create → AWS IAM Role.
-
Create an External Location at
s3://<your-auxia-export-bucket>/using that credential: Catalog → External Data → External Locations → Create. Run Test connection to verify. -
Create a destination schema in Unity Catalog whose managed location is the external location above:
6. Enable Change Data Feed (CDC Tables Only)
Only enable Change Data Feed (CDF) on tables where rows are updated or deleted and you need those changes propagated to Auxia. Skip this step for:- Append-only event / fact tables (use a watermark filter instead — see Pattern A)
- Dimension / lookup tables you fully replace each run (Pattern C)
7. Configure the Export
Each export is implemented as a Databricks notebook scheduled to run on a cadence. Choose the pattern that matches how each source table behaves. To create a notebook, open the Databricks left navigation and click New → Notebook: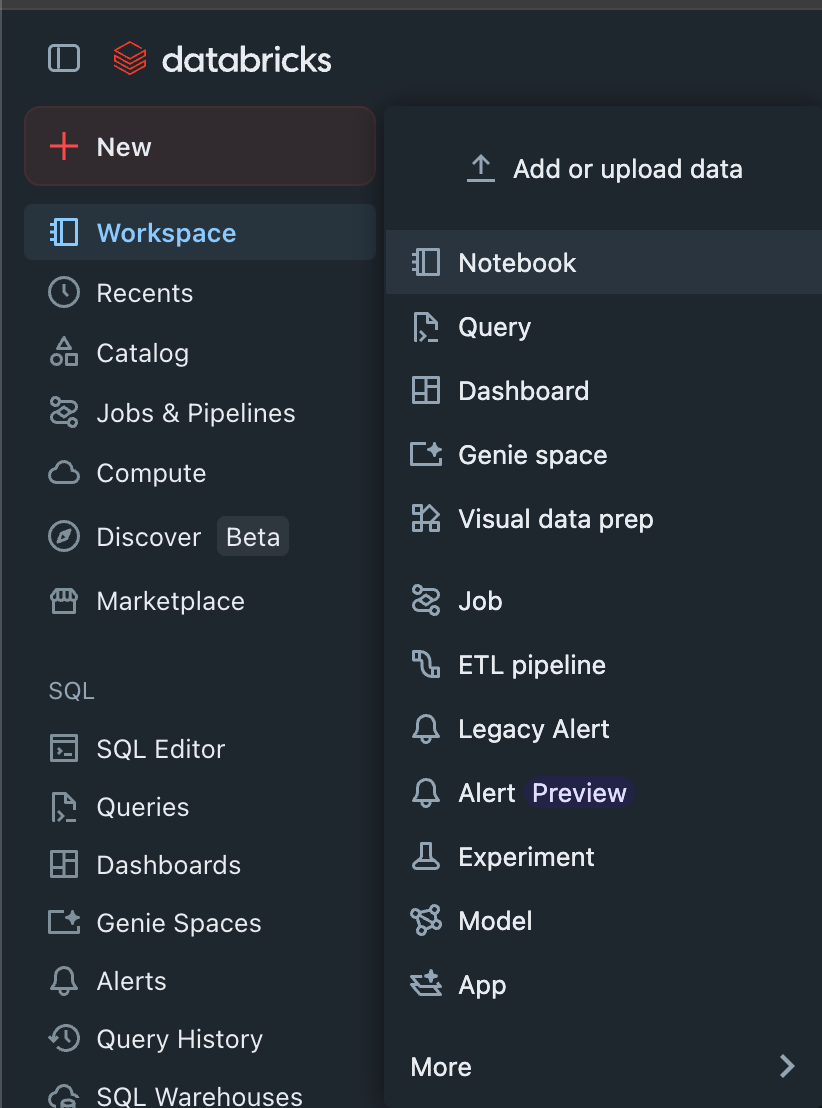
7.0 One-Time Setup: State-Tracking Table
For Patterns A and B, create a small Delta table that records progress across runs. Skip this for Pattern C (no state needed).7.1 Pattern A — Append-only Incremental
Use for: event / fact tables where rows are only ever inserted, never updated or deleted. This is the most common pattern for high-volume data. Examples: user events, transactions, page views, log records, sensor data — anything where each row represents an immutable past event.event_timestamp is a placeholder — replace with whichever monotonically-increasing column the table has. Common names: event_timestamp, created_at, ingestion_time, _etl_loaded_at. The column must never be back-dated for new rows.
Bootstrap considerations. The first run exports everything from BOOTSTRAP_START through “now.” For high-volume historical data, consider:
- Setting
BOOTSTRAP_STARTconservatively (for example, 60 days ago) - Splitting the bootstrap into chunked windows before enabling the schedule
- Starting fresh from “now” if backfill is not required
hr partition by removing .withColumn('hr', …) and the 'hr' argument to partitionBy(...).
No CDF is required for this pattern — append-only tables don’t need a change log.
7.2 Pattern B — CDC Incremental
Use for: mutable tables where rows can be updated or deleted after creation and you need those changes reflected in Auxia. Requires CDF enabled on the source table (see Step 6). Examples: user profiles (when mutable), subscription status, account settings, anything stateful that changes over time. The structure mirrors Pattern A — a scheduled notebook reads state from_export_state, exports a window of new data, and updates state — but the window is defined by Delta commit versions instead of an event-time watermark:
- Track
last_exported_version(BIGINT) in the same_export_statetable. - Read the source table’s latest version via
DESCRIBE HISTORY <table>and select_commit_version. - Read the change feed for the new range with
table_changes(<table>, last_exported_version + 1, current_version). - Add a partition column derived from
_commit_timestamp(for example_commit_date), then write Parquet withmode('append')andpartitionBy('_commit_date'). - On success,
MERGE INTO _export_stateto recordlast_exported_version = current_version.
_change_type column (insert / update_preimage / update_postimage / delete) along with _commit_version and _commit_timestamp, and is partitioned by commit date.
Output layout:
Bootstrap. CDF only captures changes from the version at which it was enabled — there is no “historical” CDF for rows committed before that. If you need to seed Auxia with the existing table state, run Pattern C once as a one-time full snapshot, then start the CDF pipeline from the version at which CDF was enabled.
7.3 Pattern C — Full Snapshot
Use for: small dimension / lookup tables where it is simpler to send the full state each run than to track changes. Examples: product catalog, country codes, role definitions, configuration tables. The notebook reads the source table and writes its full contents as Parquet to the export path on each run. No state tracking is required. To avoid Auxia reading a partial snapshot during the swap, write each run into a timestamped subdirectory rather than overwriting the same location in place:snapshot_ts=… directory on each run. Old directories can be vacuumed on whatever retention you prefer (typically a handful of recent snapshots are kept for rollback).
8. Schedule the Export
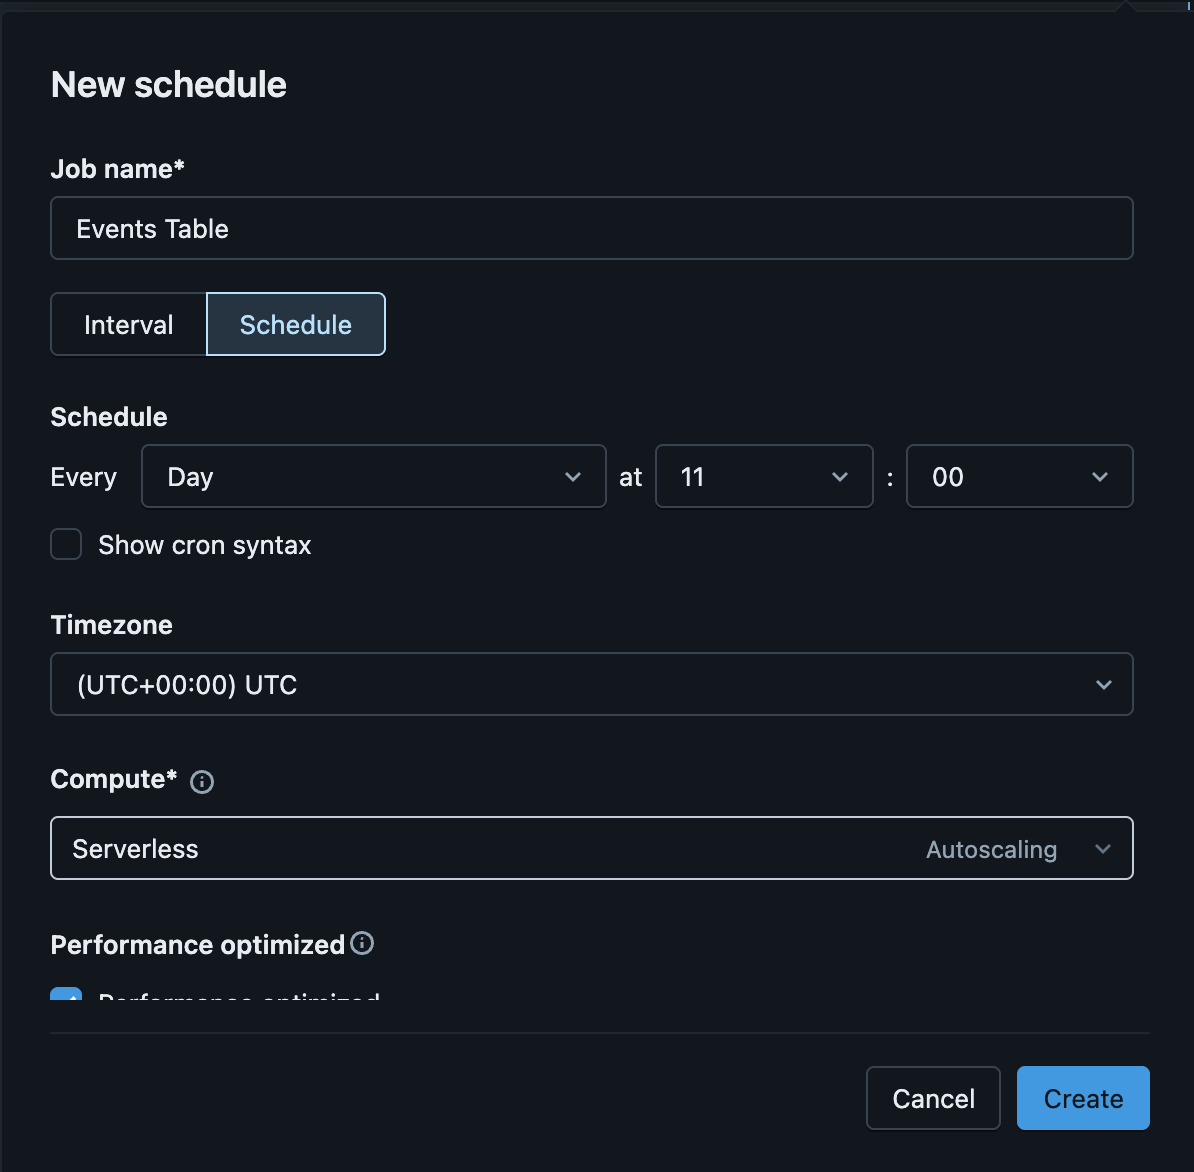
Save the notebook and schedule it:- Open the notebook and click Schedule in the top right.
- Set the cadence:
- Append-only event tables (Pattern A): hourly or daily, matching how often new data arrives.
- CDC tables (Pattern B): hourly or daily, depending on freshness requirements.
- Dimension / lookup tables (Pattern C): daily or weekly.
- Choose a compute profile (a small all-purpose or serverless compute is typically sufficient).
- Configure notifications for failures (email or Slack).
- Save the schedule.
9. Notify Auxia
Once your exports are running and files are landing in the bucket, contact your Auxia solutions engineer with:- Bucket URL (e.g.,
s3://<your-auxia-export-bucket>/) - AWS region of the bucket
- List of tables being exported, with the pattern for each (append-only, CDC, or snapshot)
- Schema for each table
- Run cadence for each table
10. Validation
To confirm files are landing in the bucket:dt=YYYY-MM-DD/hr=HH/partition directories for append-only tables (Pattern A)_commit_date=YYYY-MM-DD/partition directories for CDC tables (Pattern B)- Parquet files at the table root for snapshot tables (Pattern C)
11. FAQ
What S3 region should my bucket be in? Confirm with your Auxia solutions engineer before creating the bucket. Auxia maintains S3 read infrastructure in specific regions for performance and cost reasons. What if my source tables already have Change Data Feed enabled? No need to re-enable. Skip Step 6 for those tables. Can I export only a subset of columns? Yes. Modify theSELECT (or spark.table(...).select(...)) projection in your export notebook to include only the columns you want to share. Auxia reads whatever schema you write.
What happens if a scheduled run fails?
Databricks retries the scheduled run per your configuration and notifies the recipients you set up. The next successful run picks up from the last successfully recorded watermark (Pattern A) or commit version (Pattern B), so no data is lost. For Pattern C, the next run simply overwrites the snapshot.
How do I add a new table to the integration?
- Decide which pattern fits the table — append-only, CDC, or snapshot (see Section 2).
- (Pattern B only) Enable CDF on the source table (Step 6).
- Add a new export notebook for the table (Step 7).
- Schedule it (Step 8).
- Notify your Auxia solutions engineer with the new table details (Step 9).
When in doubt for high-volume event data, default to Pattern A — it is the cheapest and simplest.
What is the cost on my side?
- S3 storage: standard rates for the exported Parquet files (typically small relative to the source data).
- Databricks compute: depends on cluster / SQL warehouse size and run frequency.
- No cross-cloud egress on your side — Auxia handles AWS → GCP transfer internally.