Section 8: QA & Testing
Before activating any treatment, you'll want to verify two things: that it looks right and that it reaches the right people. Auxia's QA tools are built around these two goals.
8.1 How QA Works in Auxia
If you're coming from a traditional marketing platform, QA in Auxia works a bit differently. In most tools, testing means sending a proof to yourself or toggling a preview. In Auxia, QA is more structured because there's more to validate - treatments are personalized, governed by eligibility rules, and selected by AI models.
Auxia's QA workflow breaks down into two types of testing:
Rendering QA - "Does my treatment look and read correctly?"
Rendering QA is about verifying the treatment itself - its content, layout, images, and personalization. You do this by setting up QA users (test accounts that can receive treatments regardless of normal eligibility) and sending treatments directly to them.
Guardrail QA - "Does my treatment reach the right users under the right conditions?"
Guardrail QA is about verifying the rules around your treatment - who sees it, when, and why. This includes testing eligibility criteria, running simulations to validate distribution at scale, and confirming that control groups and traffic allocation are configured correctly.
When to Perform Rendering vs. Guardrail QA
| Scenario | Rendering QA | Guardrail QA |
|---|---|---|
| Launching for the first time | Yes | Yes |
| Adding a new treatment to an existing use case | Yes | |
| Updated treatment content or images | Yes | |
| Changed eligibility rules | Yes | |
| Reviewing treatment frequency before launch | Yes |
QA Tools Overview
Auxia provides four tools to support these workflows:
| Tool | Type | Purpose |
|---|---|---|
| QA Users | Rendering | Set users that receive treatments regardless of eligibility rules |
| Test Treatments | Rendering | Send a specific treatment to a QA user on demand |
| Test Eligibility | Guardrail | Check whether a specific user qualifies for a treatment |
| Simulation | Guardrail | Validate treatment distribution and eligibility across a sample of your user base |
8.2 Rendering QA
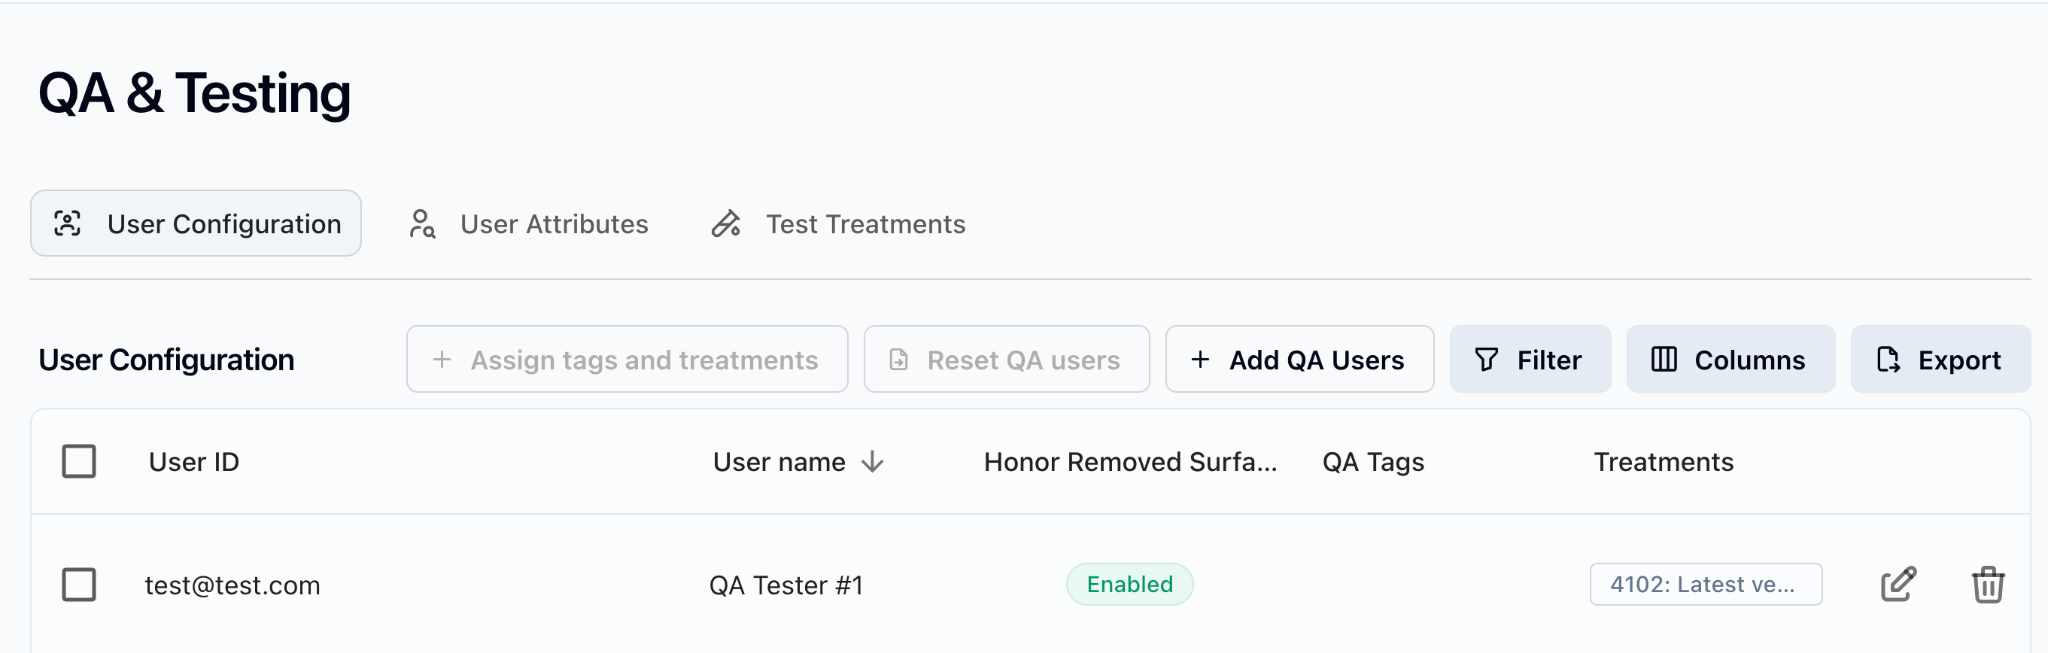
8.2.1 Setting Up QA Users
QA users are test accounts designated in Auxia's QA system. Once a user is set as a QA user, all normal rules stop applying to that user - they can and will receive whatever treatments are assigned to them, even if those treatments are in draft or paused status. Setting up QA users is the first step for any QA workflow.
- In the left nav bar, navigate to Treatments & Journeys > QA and Testing
- Click Add QA Users in the User Configuration tab
- Enter the unique User ID for the QA user (this is the specific user identifier for the use case being launched)
- Optionally add a QA tester name and tags for grouping (see section 8.2.4)
- Assign specific treatments to each user
- Save configuration
- Wait up to 5 minutes for changes to take effect
You can also optionally:
- Pin a specific treatment version to test a particular draft or previous version, rather than the latest
- Enable "Honor Removed Surfaces" to skip delivery on surfaces that have been removed from a treatment's configuration
The screenshot below shows the QA User Configuration tab after a QA user has been added.
Important notes:
- Changes take up to 5 minutes to propagate after saving
- Maximum 100 users can be inserted, reset, or assigned at a time
8.2.2 Managing QA Users
Editing QA Users
To update a QA user's treatment assignments or tags:
- Navigate to Treatments & Journeys > QA and Testing
- Find the QA user in the User Configuration tab
- Click the edit icon next to the user
- Modify treatment assignments or tags as needed
- Save changes
When you update a QA user, the new configuration replaces the existing assignments. If you want to add a treatment, you need to include all existing assignments plus the new one.
Resetting QA Users
Resetting a QA user removes their tags and/or treatment assignments while keeping the user in the system. This is useful when you want to reconfigure a user for a new round of testing without re-entering their User ID.
You can choose to:
- Remove all treatment assignments only
- Remove all QA tags only
- Remove both
Deleting QA Users
Deleting a QA user removes them entirely from the QA system. Use this when:
- A test account is no longer needed
- You're cleaning up after a testing cycle
- The User ID is no longer valid
8.2.3 Running a Treatment Test
Once QA users are set up, the next step depends on the type of surface your use case targets.
In-app / web-based surfaces (banners, carousels, in-app messages):
For use cases that rely on an API call from the app or website, no manual triggering is needed. Once a QA user is configured with an assigned treatment, that treatment will automatically appear whenever the user navigates to the in-app or web surface. The QA user simply has to visit the relevant surface and the treatment will render.
Out-of-app delivery (email, push notifications):
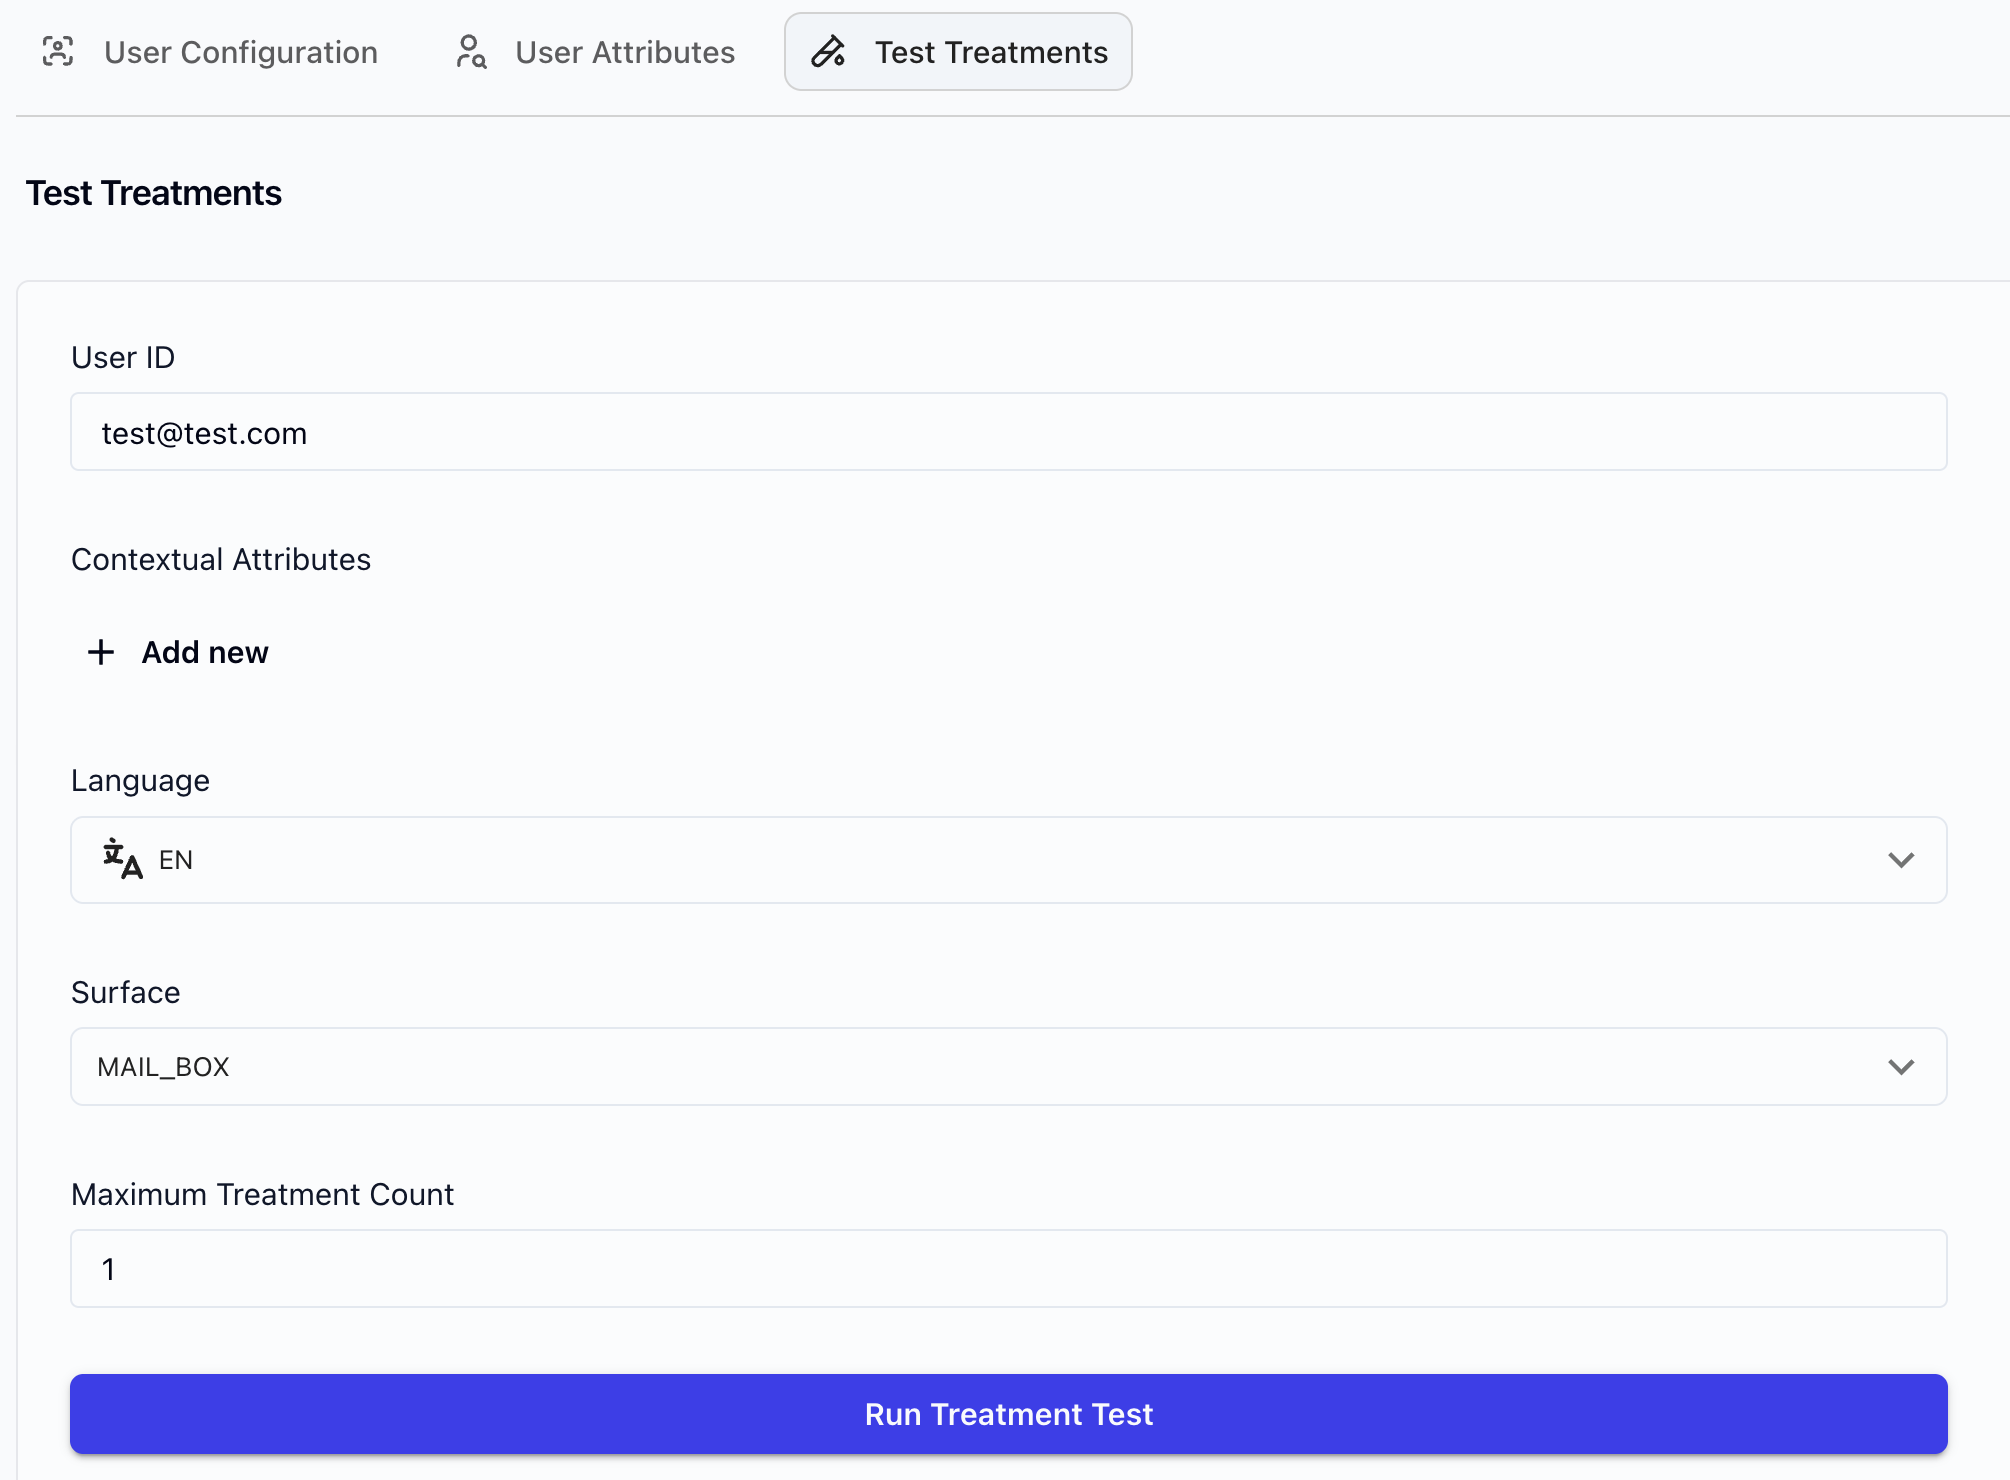
For use cases that deliver treatments outside the app, you need to manually trigger delivery using the Test Treatments page.
- Within QA & Testing under Treatments & Journeys, click on Test Treatments
- Enter the QA User ID (must match the User ID in the QA User Configuration tab)
- Optionally, set contextual attributes
- Set Maximum Treatment Count (up to 10)
- Click Run Treatment Test
- The treatment will be delivered to the specified surface if the status shows "successful"
The screenshot below shows the Test Treatments form.
Important notes:
- QA has independent logic for fetching treatments - it does not use the same caches as the production serving flow
- QA works even for draft or paused treatments
- QA will ignore qualification criteria - the treatment will be sent regardless. To check whether a user qualifies for a given treatment, go to the treatment and click "Test Eligibility" (see section 8.3.1)
- If the QA user does not have data for a personalization field, the treatment will still send - the user will receive the treatment with the raw field string (e.g.,
${personalization_field_1})
8.2.4 Tagging and Organizing QA Users
QA tags help you categorize and filter QA users, especially when managing multiple testers across different use cases or test cycles.
Creating Tags
- Navigate to Treatments & Journeys > QA and Testing
- Create a new tag by entering a tag name (e.g., "Email Pilot", "Sprint 12", "Web Banner QA")
- Save the tag
Assigning Tags to QA Users
Tags are assigned when creating or editing a QA user. Each QA user can have multiple tags. Common tagging strategies:
| Strategy | Example Tags | Purpose |
|---|---|---|
| By surface | email, push, web-banner | Filter QA users by the surface they're testing |
| By use case | onboarding, cart-recovery, re-engagement | Group users by the business use case |
| By test cycle | sprint-12, pre-launch-march, regression | Track which users belong to which testing round |
Filtering by Tag
In the QA User Configuration tab, use the tag filter to narrow the list to a specific group of QA users. This is especially helpful when you have many QA users across multiple use cases and need to focus on a specific set.
8.2.5 Rendering QA Checklists
When performing rendering QA, use these surface-specific checklists before activating any treatment.
Email
- Email renders correctly across major email clients (Gmail, Outlook, Apple Mail)
- Personalization fields show correct data (if a field shows a raw string like
${field_name}, the user is missing data for that field) - Images load properly (no broken or outdated image links)
- Unsubscribe link works correctly
- Click tracking works end-to-end
- Links/CTAs point to correct destinations
Push Notifications
- Push notification is delivered to QA device
- Content displays correctly (title, body, image)
- Deep link / landing page opens correctly on tap
In-App Messages / Banners
- Banner renders in correct position on the page
- Content displays correctly across in-scope screen sizes (e.g., website on mobile, tablet, laptop)
- Dismiss behavior works correctly
- Clicks point to the right destination
Web (Banners, Carousels)
- Treatment renders correctly in the designated surface
- Correct number of treatments returned (e.g., carousel with 3-4 items)
Debugging
If the treatment does not send, verify the QA user is configured correctly and the treatment is assigned. For in-app/web surfaces, confirm the user is navigating to the correct page. For email/push, confirm you've triggered delivery via Test Treatments. See also section 8.3.1 (Testing Eligibility).
8.3 Guardrail QA
8.3.1 Testing Eligibility
Eligibility testing lets you check whether a specific user qualifies for a treatment based on its qualification criteria and personalization fields.
How to test eligibility:
- Navigate to the treatment on the Treatments & Journeys page
- Click Test Eligibility
- Enter the User ID
- Click Test - this will reveal the user's eligibility based on the treatment's qualification criteria and personalization fields
Screenshot coming soon: Test Eligibility from treatment page
What to look for:
| Test type | Description | Example |
|---|---|---|
| Positive test | User with attributes that SHOULD match. Verify the user qualifies. | User with days_since_signup = 3 for a rule requiring < 7 |
| Negative test | User with attributes that SHOULD NOT match. Verify the user does not qualify. | User with days_since_signup = 10 for the same rule |
| Boundary test | Test edge values at the exact threshold. | User with days_since_signup = 6 and days_since_signup = 7 |
8.3.2 Running a Simulation
Simulation validates that your configuration works correctly at scale before you go live. It tests a sample of your user base against your treatments to verify distribution, eligibility, and personalization coverage.
Unlike Test Eligibility (which checks one user against one treatment), simulation runs your full configuration against a sample population. This is the only way to catch issues that emerge at scale - for example, a personalization field that's missing for 80% of your user base, or eligibility rules that unintentionally exclude a large segment.
What simulation validates
- Qualification criteria - Are the right users eligible for each treatment?
- Personalization field coverage - Do users in the sample have data for the required personalization fields? A treatment won't be served to a user missing a required field, even if they pass qualification criteria.
- Model behavior - Is the model distributing treatments across eligible users as expected?
When to run simulation
- After all personalization fields and eligibility rules are in place - but before activating
- Before any launch or significant configuration change
- After adding or removing treatments from a use case (to verify the existing distribution hasn't shifted)
- After changing qualification criteria on any treatment
How to run a simulation
- Navigate to the Simulation page in the console
- Define the number of users to include in the simulation
- Select the treatments to test
- Run the simulation
- Review the results
Screenshot coming soon: Simulation setup page
Interpreting simulation results
Simulation results show, for each treatment, the percentage of sampled users who qualified and would receive that treatment. Walk through the following checks in order:
1. Check that every treatment appears in results
If a treatment is missing from simulation results entirely, it means zero users in the sample qualified. This usually points to:
- Qualification criteria that are too restrictive
- A required personalization field that has no data for users in the sample
2. Verify qualification rates match expectations
For each treatment, compare the qualification rate against what you'd expect based on the criteria you set. For example, if a treatment targets users with days_since_signup < 7, the qualification rate should roughly match the proportion of your user base that signed up in the last 7 days.
| Qualification Rate | What It Means | Action |
|---|---|---|
| 0% | No users in the sample qualified | Check qualification criteria and personalization field coverage. Criteria may be too narrow, or a required field may be empty for all sampled users. |
| Lower than expected | Fewer users qualify than anticipated | Check whether personalization fields are reducing the eligible pool. A user can pass qualification criteria but still be excluded if they're missing a required personalization field. |
| Higher than expected | More users qualify than anticipated | Review whether qualification criteria are broad enough to be intentional. Check that mutual exclusion rules are in place if needed. |
| 100% | Every user in the sample qualified | Verify this is intentional. If the treatment should target a specific segment, the qualification criteria may be missing or misconfigured. |
3. Check treatment distribution across the eligible population
If multiple treatments are active, verify:
- The model is distributing treatments across eligible users (not all traffic going to one treatment)
- Distribution aligns with any priority or weighting configuration
- If distribution looks heavily skewed toward one treatment, check model config and treatment priority settings
4. Validate experiment configuration
If the use case has an experiment (treated vs. control):
- Verify the control group percentage matches the experiment design
- Confirm treated users are receiving treatments and control users are not
- Check that traffic allocation percentages add up correctly
Red flags summary
| Red flag | Likely cause | What to check |
|---|---|---|
| Treatment missing from results | Zero qualification | Qualification criteria, personalization field coverage |
| 0% qualification rate | Rules too restrictive or missing data | Criteria logic, required personalization fields |
| 100% qualification rate | Rules too broad or missing | Whether criteria were set, whether they're intentional |
| Skewed distribution | Model or priority misconfiguration | Model config, treatment priority, mutual exclusion groups |
| Control group size doesn't match design | Experiment misconfiguration | Traffic allocation settings, experiment arm configuration |
8.4 Common QA Scenarios
8.4.1 Pre-Launch QA
Before going live for the first time, run both Rendering QA and Guardrail QA end-to-end.
Rendering QA:
- Set up QA users for each surface (email, web, push, in-app)
- Send test treatments to each QA user
- Verify content, personalization, images, and CTAs on every surface
- Test on multiple devices and screen sizes
- Run through the full Rendering QA Checklist (section 8.2.5)
Guardrail QA:
- Test eligibility for positive, negative, and boundary cases
- Run simulation to validate treatment distribution
- Verify control group and traffic allocation
8.4.2 Launching a New Treatment
When adding a new treatment to an existing deployment:
Rendering QA:
- Send the new treatment to QA users and verify rendering on all target surfaces
- Verify personalization fields populate correctly
Guardrail QA:
- Test eligibility to confirm the new treatment doesn't conflict with existing treatments
- Check mutual exclusion groups
- Re-run simulation to verify distribution hasn't shifted unexpectedly
8.4.3 Post-Change Validation
After updating an existing treatment or configuration:
| Change | Rendering QA | Guardrail QA |
|---|---|---|
| Content update | Yes | |
| Eligibility rule change | Yes | |
| Configuration change (model config, traffic allocation) | Yes |
8.4.4 Debugging a Live Issue
When something isn't working as expected in production:
Treatment not rendering:
- Check that the QA user is set up correctly and the User ID matches
- Verify the treatment is targeting the correct surface
- For in-app/web: confirm the user is navigating to the correct page. For email/push: confirm delivery was triggered via Test Treatments
- Send a test treatment to isolate whether the issue is content or delivery
Treatment reaching wrong users:
- Review eligibility rules for the treatment
- Test eligibility with specific user IDs to verify qualification logic
- Check mutual exclusion groups for conflicts
- Re-run simulation to check for distribution anomalies
8.5 Troubleshooting
Treatment does not send to QA user
- Verify the QA User ID matches exactly
- Wait 5 minutes after saving changes for propagation
- Confirm the treatment is assigned to the QA user
- For in-app/web surfaces: confirm the user is navigating to the correct page where the surface is rendered
- For email/push: confirm you've triggered delivery via the Test Treatments page
Personalization shows raw field strings (e.g., ${field_name})
- This means the QA user does not have data for that personalization field - the treatment still sends, but displays the raw string
- Check that the personalization field names match exactly in the treatment configuration
- To see proper personalization, use a QA user that has data populated for those fields
Simulation shows unexpected distribution
- Review qualification criteria for each treatment
- Check for overlapping or conflicting eligibility rules
- Verify personalization field coverage across your user base
- Ensure mutual exclusion groups are configured correctly
For issues not covered here, contact your Auxia support team.
Next Section
Continue to Section 9: Configuration for system configuration documentation.